Saturday, April 10, 2010

2: The Perfect Red Lip

A classic-year round look is the red lip; it always has been, and it always will be. 


Finding that perfect shade can be hard, and learning the best way to apply it is up to you. But here are my tips on finding your right shade, and the ideal way to make that shade last and look perfect:) 


There are soooo many red lipsticks out there... how would you know which one is best for you? It might seem obvious, but the best way to know is really just to try it on your lips. If you're in a Sephora, just swipe one of those sample lip brushes across a lipstick and put it on, simple as that. Although we all have different skin tones, and there are shade recommendations for each, just try some colors on your self and see what works. You really want to stick to that fire-hydrant red, maybe with some gold or plum or orange undertones, whatever it may be. 


If you still can't decide what the best color for you is, ask a beauty associate at a store like Sephora what undertones you have in your skin, and they will be able to match that with a red lipstick consisting of the undertone that goes with yours. 


Steps to putting on the lipstick: 
1) Exfoliate your lips with either a lip exfoliator or just an old toothbrush to take off any chapped parts of your lip. 


2) Apply a light layer of plain chapstick (no shimmer, wetness, or glossy feel to it) so that your lips are moisturized 


3) This is optional, especially for teens, but helps keep your lip color lasting longer: Fill in your whole lip with a red lip liner (similar or exact to the color of your lipstick). Make sure that you stay on the edges of your lips, not going out of them to make your lips look larger, it will actually just make you look silly haha. Applying the lipliner is like priming and adding a base to your lips so that the lipstick will really stay on your lips and maintain that deep red color. 


4) Then take your lipstick. If you have a lip brush, use it for more precise application, especially for around the outer areas of your lip, and especially if your lipstick is round from a lot of use. But if you don't have one, it's fine.    


If you have a lip brush: Rub it onto the lipstick and apply all over your lips, making sure you reach everywhere. You'll probably have to rub it on to the lipstick a few times to finish your whole lip. 


If you only have the lipstick: Slowly and carefully apply it onto your lips. Make sure you have an even amount of color everywhere. 


Even though it comes out more precise with the lip brush, I like using just the lipstick because it gives a more rich color. 


5) "Smush" your lips together so that the color is evenly distributed on both your top and bottom lip. 


6) Smile!! make sure you didn't get any lipstick on your teeth... ewwwwww... 


....and you're done! hope this helps you out it works great for me :)  


-Sara 


1: Five Popular Drugstore Products

Hey everyone :) 


So recently I purchased 5 makeup products from my local drugstore (you can buy them all at whatever drugstore near you). Overall, I'm mixed about them. I love some, but dislike others. Here you go... 


Maybelline New York Instant Age Rewind Double Face Protector (light shade):
I believe it was about $11 and although I'm a teen and don't need products for aging, I think it works pretty well. Having pretty dark under eye circles, I'm always on the search for better concealers (let me know your favorite) and I definitely like this one. Basically what it is, is a double ended concealer. One side is the concealer, and the other is a highlighter (they call it illuminator). I apply the concealer under my eyes and the illuminator on my brow bone, and occasionally my cheek bones and the bridge of my nose. The concealer does have some flaws though. Although I really like the illuminator, it's sheer yet noticeable, I find the concealer to have decent but not amazing coverage. As well, it works great the first few times that you use it, but as you get to the middle and end of the product, which comes quickly, it gets flaky and dry, and doesn't blend well at all. This may happen with a lot of other concealers, but it happens so quickly with the product that I have to re-buy it pretty often. It comes in shades for all different skin tones.  2.5
 to 3.5 out of 5. 


CoverGirl Outlast Lipstain (in Flirty Nude): This lipstain goes for between $8-$12 depending on where you buy it. A lipstain is neither a lip gloss nor a lipstick. It's basically a product that gives the color of a lipstick, but goes on without that heavy feel and lasts for much longer. This lipstain definitely does that. For one, it's a very buildable color, meaning that if you don't want a very bright, deep shade, you can use less pressure, but if you do, just put more pressure on when applying. There are a few things I don't like about this though. One, it's not a good product to buy if you have dry and/or flaky lips because it tends to make your lips feel more dry and it sets into every crease of your lip. But I've been using an overnight lipbalm (many brands are good but I use Neosporin Overnight Renewal Therapy) and my lips feel much more hydrated when I wear the lipstain now. As well, because it is a stain, keep in mind that it doesn't blend like a lip gloss, so put it on every inch of your lip. And apply more color in the center of your lips because it does not come out as pigmented there compared to around the edges of your lip. Also, it's not really a big deal, but for at least the color I bought, it was not true to the name at all. When I bought "flirty nude" I was under the assumption that it would be a nude, beige shade, but in fact it was a really bright, deep red.It's very flattering, just not what I had anticipated. But anyways, I really like the applicator. Unlike a lipstick that becomes rounder with use and makes it harder to apply, the CoverGirl Outlast has a pen-like applicator that works really well in achieving a precise coverage. It comes in 9 other shades. 3.5 to 4 out of 5. 


CoverGirl Smokey Shadowblast (in Bronze Fire): You can buy this for around $8 or $9. I saw the commercial for this and right away made a plan to buy it because it looked so cool. It's a dual ended eye product, one end is round and the lighter base color, and the other is a very tapered, darker liner color. With it, you're supposed to get an easy but great-looking smoky eye. I do really like the staying power and the shimmer of the base color (it's a shimmery light gold/bronze) but over time it did crease a lot. With the liner end, I don't really see how it creates that very smoky look, and it didn't show up well on my lower lash line and water line. Also, once the darker end is used a couple of times, the sharpness fades, and I don't know what I'm really supposed to do with that haha. Maybe it's just the way I put it on, or the fact that I bought lighter colors from the traditional black smoky eye, but the finished product on my eye looked more crisp than a smokey look. The Smokey Shadowblast comes in 5 other shades. 2 out of 5 


CoverGirl Exact Eyelights Eye-Brightening Mascara (in Black Gold): This isn't CoverGirl's most recent product but I LOVEEEE it! I bought it when it first came out (after I saw Rihanna's commercial for it haha) and although there wasn't a drastic enhancement in my eye color, there was definitely a noticeable one. Even now, and it's been almost a year that I've used it, I still get compliments on my eyes. The color I use which is for hazel eyes is called Black Gold, and on the lashes it's hard to see the actual gold, but on the brush, it's definitely visible so you know it's not just a flat black color. It lasts really well like a lot of other mascaras, and it's great with lengthening. By the end of the day, when I remove my makeup, my lashes are dry and a little flaky, but I expect that from wearing a mascara for so long. I really don't have many significant complaints about it at all and it's definitely one of the best products I own, including expensive brand name beauty products. It comes in three other shades for blue, brown, and green eyes. 4.5 out of 5 


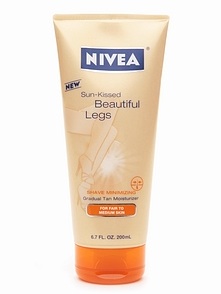
Nivea Sun-Kissed Beautiful Legs (for fair to medium skin): I got mine for around $10. This product is a gradual sunless tanning lotion, so it's supposed to moisturize while giving you a natural looking tan. Because it's for legs, the product also advertises that it's formula is shave-minimizing. There were definitely two major ups and downs for me with this product. The major plus was that on the back of the bottle, it says you achieve your full tan in 5 days and from just the second day I had suchhhh a color change. Not only that, but the color was a natural looking yet very noticeable tan; not a fake or orange looking shade. But the major downside of the tanning lotion was that it was VERY streaky... so streaky that in the sun light it looked like actual clear dark lines running down my legs. So although I wish i could use it like any other normal lotion, I have to rub it in really thoroughly and also make sure that I cover every inch of my legs. This lotion also comes in a shade for darker skin tones.  If this doesn't sound like the best for you there are so many other lotions just like this but with different prices, bottle types, etc. 3 our of 5  


I hope this helped you out, and leave a comment for any questions of comments you have! :) 


-Sara 

Friday, April 9, 2010

Hi :)

Hi everyone! I've never done anything like this before, but I figured everyone should start somewhere so here I go... 

My name is Sara and I'm from New York (and I may be a little bias but I do think it's the greatest city in the world) :) 

I finally found the drive to start my blog because I have always been very into fashion, and these days, especially beauty. When I was younger, I always wanted to be a doctor. That may seem totally irrelevant, but a little while ago I bought "The Teen Vogue Handbook: An Insider's Guide to Careers in Fashion". I'm pretty sure I read the entire book from the moment I first opened it. Every page interested me immensely, but one part especially caught my eye, the Beauty and Health Expert article. As I read through Eva Chen's, the Beauty and Health Editor at Teen Vogue, article I sort of had an epiphany haha. She talked about how she had been traveling on the medical school path, but spontaneously decided to change and become and editor for beauty and health. From the first to the last sentence, this article, as corny as it sounds, spoke to me. I realized that this was the perfect combination of what I loved, and that a job like this would be what I'd love. So from then on, I became more and more into makeup and beauty and more, in the hopes that one day I could be just like Eva Chen. 

So basically my blog can be anything and everything about health and beauty... from makeup products, applying makeup, health tips, and more. 

I hope you all find something to enjoy in reading my blog and please feel free to write a comment about anything. 

Thanks for reading :) 

-Sara